On this week we had another lesson on how to animate from planning to polish in the splinning pass, more or less like this:
1. Planning your animation.
Start thinking about what you want to do, and try to find and made as much references that you can.
2. After that, start the blocking pass.
- Make sure about your camera because the silhouette must work fine
- Start a rough block and capture the feeling of the important poses;
- Push them after make sure they are working;
3. Put the breakdowns.
- Divide your animation and work in sections;
- Don't forget the overlap and put weight on that;
4. Director/Mentor tip (looks like the teacher on Juan's shot haha!).
- Remember your goal, and make sure your mentor knows it too;
- Be specific and be ready to receive critiques.
5. Apply the notes.
- Put all tips into practice;
- Go to spline;
- Re-check the spacing;
- Re-check the path of action;
- Clean all curves and nail it.
6. Have fun!
Besides finishing our last shot with Ballie (phewww..), we started to plan our next shot.
See ya!
A quote to finish this amazing year:
"I have never in my life learned anything from any man who agreed with me"
- Dudley Field Malone
Hips one more time, because they are important.
Take a walk in front of mirror and look at the movement of your hips. Have so much importance on your hip so that movement can happen. This is because the hip start and drive the movement and this make a huge difference between a good animation and a bad animation. When we stand, our weight is never centered between the legs. For this reason, we shift to one leg or the other to distribute the weight. When you do it, it forces the hip to make an angle up on the leg that is taking the mass of your body.
"And why I don't fall?"
Because your Center of Gravity. Remember: all body is pulled to the center of the Earth, because the Earth's mass is greater. Otherwise, if we jump off, would leave the Earth orbit. Therefore, Center of Gravity is the point where you can balance all these forces of attraction.
To simplify finding your center of mass, you can draw a line from the neck down to the heel of the supporting foot and you can see if your pose is working or not.
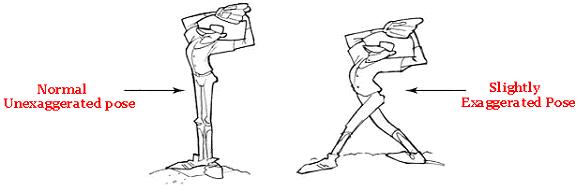
"Okay. But what if my pose is extravagant?"
Well, always remember your hip is driving and starting the movement. Give attention to it to make your pose works. Let me show an example.
Look what she did with the arm to balance the body. And look how the body is distributed between the center of mass.
"I can break the rules?"
Yes, you can. In animation, we have freedom to exaggerate but, as always, know dosing and where you will do it. You can break the rules, but if you ever do it, lose the believability
Woosh, after choose what you will do, record and take a lot of references, have made your thumbnails... Is time to animate!
In the Animation Mentor we have to give a Stepped version.
"Yeah... You show it before. What exactly you need to show in a stepped mode?"
Since the stepped mode will give a "stiff" animation, you need to show the most important points like your keyframes, breakdowns and some inbetweens.
- Be sure about your camera! If you change after start it, sometimes your silhouettes loses the clarity;
- Focus on strong poses: as you are showing your idea without some in-betweens, you need to be clear;
- Try to be sure where you want your breakdown: Start to think in your arcs and use the breakdowns to define motion in your animation;
- If you can add overlap, do it. As much information to show to your director, better for everybody;
- After doing your poses, start to think in your timing: Adjust and watch till the timing be clear enough. Don't forget to add anticipation when necessary.
"Okay... What more?"
Feedback! Always be ready to receive and give feedback to everyone. The process will let you tired and your eyes addicted. So it's always good to receive some fresh eyes, even during the blocking... After all, this is where you should be clear while you present your idea.
Woot. How long!
I'm on a trip since I start class 2 and didn't have time to balance my life with my blog... So here we go!
I'm sharing with new classmates lessons in Class 2 (Psychology of Body Mechanics) mentored by Patrick Danaher! He worked at the new feature Hotel Transylvania, and was a great opportunity to be able to absorb what he has learned and produced for this different cartoony experience, which provided a new style for 3d animation.
Without drowsiness, begin the week researching what we will do one more exercise in our little ball with legs. On Class 1 we learn the various principles that we apply in our animations. The importance of each step to get the final animation. Now it's time to use them!
"It's been so long ... Could you refresh my memory?"
Sure. Let's talk about blocking, which is focused in class this week.
When you have an idea, you need to work it until it becomes something concrete. After that, you need to express and sell your idea and that's the purpose of the blocking phase.
This week has opened my mind about the priorities for your shot in the first stage. Before start your shot, make some questions for yourself:
- What are your goals for this shot? - How many frames do I have to sell it? - In your reference, the action is clear enough? The timing is acceptable?
Normally the body mechanics shots on the exercise are fast. You have between 5-10 seconds, so you need to have a clear goal for that. They will give a step and a big jump? Will just wait and kick? Keep it simple. Doesn't matter if you will do cartoony or realistic or even a mix... Just make it believable! After clarifying that, I think you're ready to start blocking. "How do I know this will be believable?"
Once you have a clear idea of exactly what you want... Look for references! Or be unique.. Make your own references. You don't need to be an actor or have awesome abilities with your body to show the idea.
After that, make thumbnails. Yeah! About your poses... You can do it in a different ways! Have some who prefer to do like a storyboard and exaggerate the poses on the 3d with drawing or your feelings, I don't know... The possibilities are infinite. My mentor, for example, prefer to take just the most important poses of the shot (something between 3 and 5) and make roughs of this, exploring more these poses.
Wohooo!!!
Class 1 finally ended. I can say that we learned a lot about the animation concepts. Also the value to bring life for anything! With power of animation, you can show for the public that a ball or an orc, or a biped moves, breathes, feel pain. IT LIVES!
I made so many friends who are helping me to improve my work. So thanks for the new, to the olds, my girlfriend and family for supporting this journey. And coming the next term! See ya around :)
Yeah. This is the last exercise of class 1. Phewwww!
Well, in the previous week we understand a lot about exaggerating your poses, your timing, etc. You want more cartooning? Exaggerate in your anticipation, right? And so on...
And if I told you in addition, you should worry about the rhythm of your animation?
"What do you mean?
If you want to be different, you need to do something different.
Sometimes a long cycle gets boring when you don't break the rhythm with something different. In my case, I use a higher jump plus a run.
"What's the difference between walks and runnings?"
Good question. As we learned in the first principles, for a faster movement, you will need fewer frames. Furthermore, there is something that we should worry about.
In my case, I used a 4 frames cycle to seem more cartooning. Note that if you think like a circle movement, makes it easy to think how many frames you will use for. The less you have, the faster will be as far the frame distance.
Anyway, he's my final assignment. Hope you enjoy :)
Yay! We are practically in the last exercise on class 01. In the previous week we finished learning all the basic fundamentals for a walk. And during this time, you should imagine that there are millions walks, right?
I've lived my college time in a big and bustling city, and if you stop for a minute to see the movement, you can see how diverse the walk is. You can see how the person is tired or hurry and their mood, only with the way he walks.And that's what you should look to apply in your walk.
"And how I'll do it to animate?"
Well, one of the main thing you need to think when you put personality is the weight. He will tell you a lot about your character. For example: a fat character! He will have a footstep change fast or slow?
"Hmm... Slow!"
Exactly. Think the motion difference with Roadrunner. He is so fast that you don't have courage to think that's heavy, right? You have to worry about your timing & spacing and inbetweens of your keyframes. It's like thinking about how many words you can make with the alphabet. The possibilities are endless. You will need many references. Record your own, look around! There is no excuse to what the internet can offer. When you start your gold poses, you will notice that there are similar poses with vanilla walk.
"Oh yeah? And what's the damn difference?"
Simple answer. Exaggeration. Unless the purpose of your animation is an almost rotoscoping and faithfully follow the reference, the animation will be boring! How is the mood of your character? The head is down because he is sad? Pull it down! Warp the spine and leave it devastated!
The more you can show who is your character, what he is doing, better! Remember: The people are watching defines what and who the character is. If you can sell this without your character say a word, you win.
"Okay... How do I dose the exaggeration?"
You cannot exaggerate too much. But also cannot leave as your human reference, because it will be boring. Train hard and show how your mileage will show the way.
Other tip is to think your poses as "story-telling poses" as Don Graham likes to call and making this more expressive. Also, you should take care of your silhouette.
Try to see the silhouette of the poses in your animation. When it is a mess, fix that. Certainly the result will improve in your animation. Look at the second example as he moved his left arm to improve the line of action of the spine. Sometimes it doesn't seem so clear in a silhouette like this where the arms are together with the body because is in perspective. But a silhouette in side view has difference.
Pheww... Class 01 is almost done. Here is my assignment:
Well, in this week 9 we are introduced to a problem that follows the animators till the end of their careers: Pops!
In the previous week we saw the importance of finding great gold poses. They are crucial for the moment to clear your inbetweens and everything.
"Okay, okay... Now I'm curious!Explain about these pops!"
Pops are dislocations improper in a short interval of time. It happens when something moves too much from one frame to another and he seems to jump. As an (bad) example, take a photo with your hand holding a cheek. Now, without moving, take a photo with the same hand in your mouth. Flip the two pictures and you'll see the hand jumping. Well, as you know, in 3d animation you should follow the rig model. I've had experiences with 2d animation in college and I can say that when you have something popping, you deform the design with your pencil or your tablet and will have no more problems... for now.
The biggest pop I suffered was the knees. It's a big challenge to put them in the right place and not let them jump. All this mixed with their gold poses. If they do not work, you can not fix the rest. In 3d this step is called Spline, where you will smooth your tangents on Graph Editor. To corrections, there are 3 parties in the body that work for this exercise: hips, leg and foot.
"Geez..! I don't know how these things work!"
First of all, walking is a system of controlled falls where energy is conserved. Knowing this, let's start with the hips. Last week we understand that here is a rotation during the change of steps. This happens to you don't lose your balance andbe able to control your center of gravity. The rotation occurs at the hip joint, not at the lower back. From the top view, you will have something like this:
Note that in passing position or close to it's when your body is straight. It is the moment that minimizes the body's center of gravity and prevents you to fall. The motion of walking is not perfect. It will behave like a boucing ball, but the difference is arc looks like a wave. Track the hips. Moving like a wave? Great, It's working.
Okay, now let's talk about the legs. Something that can give character to your walk is what you do with the legs. People tend to find that they spend most of the walk stretched or even forget to think about the move it behaves.
The legs are broken at joints and tend to move different in side and front view. The knee will go out at sometimes and will close to the hip on another. Also, do you remember the pendulum's exercise? The leg behaves like that, look:
"This is just crazy."
Actually, this is just just too much information. When you start doing, makes sense. You will find your biggest problem in your legs, in my opinion: the knees pops. To control this, you should stretch the leg sometimes, have to pull the hips more forward or backward othertimes.
Patience is your best ally.
In addiction to solving these problems, you have the foot. When it comes to animation, you should decide when the steps into the ground, and when it comes out. None of this happens out of nowhere and the computer is stupid, it will not do for you.
The foot is also broken into joint too, which gives toes for you.
We can not forget to make the overlap movement of the toes. This makes the animation much more dynamic. Furthermore, the foot will make an arc like this:
Note that the foot is about to leave the ground with a position and lands in another. You land your foot heel, until have 100% of the foot on the floor. Then you get to take your heels until finally the toes.
"Wow... I can feel the nightmare chasing me... What the hack?"
Yeah, in practice you realize why the animators have work to do a good walk cycle.
Track everything and see what happens. Don't let your knees have very different spacings. Don't leave the shin repeat movements. Make it always move in one direction, remember the pendulum. Remember how your foot lands and especially the arc that he must follow. Don't rely on the computer. Make the most of the frames by hand and then worry about cleaning up the Graph Editor when it makes sense. But most importantly: have fun! :)
Below my entire assignment of this week. See you!
Pheew... Second full month completed. In the previous week we had something organic like a tail, also we gave personality to the ball owner. This week we have something more human: walk! Above, my mentor teaching me to walk (rereading and inspired by De'Von Stubblefieldem). This exercise has it's own special importance.
"C'mon.. What is the difference of everything we've had so far?"
I'll tell you why. Walking can say who you are. Can say about your mood. Often you express what you are feeling with words. On walk you can express it all! Try to see Goofy walking. You can clearly tell that he's a dummy just like the way he walks. And you never have a walk like another. The possibilities are endless!
The purpose of this week was to animate a Vanilla Walk, which means a no personality walk.Watch people on street and you'll understand what this is about. They all ilustrate something like this:
Reminding the previous exercises, you will notice that the body risesand falls like a boucing ball.
"Hmm, you are right. I'm sorry to say that balls are not important to be animated..."
As boucing balls, animate a basic walk is part of the process to understand these steps above. Let's talk about them:
Contact Pose: This is the moment you rest your feet or toe on the ground. Usually the walks start with this pose.
Extreme Down: Here is the moment that you support your contact leg, feel the weight and picks up momentum for the next step.
Passing Position: You will have a straight leg, and the other ready to change the position.
Extreme High: It's the high point of the walk where the body begins to fall towards the other leg to make contact.
Repeat the process with the other leg and you will have a Walk Cycle.
"Walk what?"
Cycle is when you repeat something at the last frame is linked to the first, and then it become a loop. This allows an animator save time. You will have something like this:
In the case of this assignment, we have 5 key poses. 4 different, with the first and last equal, with different feet.
Something to note is how the hip works. Let's look from the image below:
As you can see, the hip will make a movement similar to a wave. It will also rotate, and the highest values are in the extreme poses.
"And this 0.5s?"
It is related to the time of half cycle. A full-cycle is only complete when the last frame is the same to the first pose. A basic walk defaults to 24 frames.
This week the walk is only a blocking, showing the key poses in stepped mode. Inbetweens is just next week.
In addition to the walk, this week return to do poses. This time we did a pose that demonstrate physical strength. I had trouble in some aspects. I'll show you why.
"This is awesome! Where's the problem?"
Well, in this assignment I realized the difference between doing force, be strong, and win something easy. More than ever you must reflect the weight in the pose. And here Stu is doing strength.. But he is the weak! Jose warned me saying that Tailor looks the strongest here. It feels like Stu is struggling to pull Tailor. For Stu to feel powerful he basically needs to be standing there calmly while Tailor tries to drag him away unsuccessfully.
So I took a deep breath and tried something different:
Well... No success again. If you remember the film, Thor cannot remove the Mjölnir.We concluded that the use of strength is there, but the main character is weak.
Therefore, my assignment of week 8 was like this:
So far we commit animations with intervals - what I mean is all the inbetweens among breakdowns and gold poses. There are many ways to do this. You can simply do frame by frame, or can think of your main poses with the help of Graph Editor.
Using a graph, you can understand if your animation is accelerating or decelerating, if you have holds and other problems solvable by GE.
"Are you telling me that not only need to know to animate, but also need to read graphs??"
This is not something to be afraid. The tool is here to help, not hinder. When you have too many keyframes, your timeline will appear to be bleeding, and you can easily get lost in what you are doing or where you need to fix. Besides, sometimes you want your animation do something like go ahead or nice arcs.
"Okay. You are convincing me. Tell me exactly what it is that Graph Editor do"
Basically, the graphis a Inbetweener. But he sucks! That's why we say that the computer doesn't the work for you. And that is why the Graph Editor is malleable: fix by yourself and do what you want.
Let's talk about the tangent types and how it's looks like. Firstly you have something in the Y-axis represents the value (can be height, distance, amount of squash & stretch, etc) and the frame on the X-axis.
The first type is the STEPPED mode. The Graph Editor will not interval for you. Will display only the frames you did with holds lasting until the next keyframe. It's used to see if your timming is working. Normally is the first stage in a 3d animation. It will looks similar with this:
Your poses are working well with your timming? Great! Let's see this in LINEAR mode. Here you will see everything at a constant speed. It's used currently of blocking for you be able to see if everything is okay before leaving for next step.
After that you finally can put straight easies in and out from the graph with FLAT tangents. "Yes, we can!"
Having this basic knowledge, you begin to realize that you not only organizes the way that your animation is going, but also can add anticipations, overshooting, easies long or short... everything!
Also a clean graph editor will give for you much more fluid animation, so it's good to get use. Don't let the computer do the work for you!
This is me in my seventh week (inspired by De'Von Stubblefieldem). Here the purpose was animate a character with a tail. Although the concept of overlap has been presented in week 6, knotted in my head when involved arcs and respect the character rig. Different from the pendulum, here there is much more personality to transpire. Also, we learn to animate in layers!
"Wait a second... Layers? Are you saying that is like photoshop?"
Okay, let's talk about it first.Well, do you remember that one way to animate the effect of an overlap is to animate part by part? Basically that. Overlap is about a single member. Layers are used to animate parts of the body separately.
To better understanding, know that there are some ways to make an animation. Let's talk about them.
Straight Ahead as it is called when you start doing your poses frame by frame, sequenced behind each other. This will give a natural flow, you will know improvise and your scene will become a box of suprises. You can see the advantage or disadvantage asthey often do things that you did not expect, and do things beyond what it should. Remember: you usually have a pre-determined time for each scene, andwith this method you can easily blow.
To avoid these problems, there is a method called Pose to Pose. Here you decide the most important poses of your character - your keyframes. Then their breakdowns, and finally their inbetweens! This will give a clear and calculated scene. But you can lose the fluidity of your animation...
The third is a Fusion of the previous. Planning your scene, do a lot of thumbnails and try to find your keyframes on that. Dont run away from the center of interest. Put anticipations and other things. Work with your straight ahead based on this. If something is wrong, change your keys or replace them. You will see the importance of planning more than ever.
Try everything. Just Keep it Simple and find the method that will best fits you!
Layer animation is more or less it on this assignment: First animate the ball. When it is working good, we animate the tail!
Reminding the Wave Principle, the tail will behave more or less like this:
When the Primary Force is moving, the tail will follow the arc in different orders, one joint at time, giving the effect of Overlap. For a good overlap, ensure a good dragging motion.
Below is my assignment of this week. See ya!
Hello! Long time...
After half class achieved, this post will be a little different. Is not about my exercises or animation theory, but animation in general. Many friends don't even know what I do and what is needed for a final product in the movies or series, commercials, or their video games, then this post is directed to it.
Animation consists briefly of imaging and representanting action. You will represent a sequence of events! It all depends on who and how you want to tell the story. Norman McLaren once said "how it moves is more important than what moves". The basic ingredient is the storytelling, design and how it will move. This means: you need to have a good solution in your story with a beginning, middle and end; a nice design that makes sense to relate a scenario X with characters Y and Z, with good color palette and all of this can talk among themselves.
Sounds easy when you think of doing but is not. The making of animated film requires a large volume of work and technical processes of some complexity.
Below, a simple process that I will talk about is the 3d animation.
1: Everything start with an idea. So work this idea until it's polished, solid and then you can move to drawing!
2: Here you, as a filmmaker, will use drawings to develop the action of the film. Even scrawled drawing, transmit emotion and the action of your story!
3: Record the voices of your film so we can join with the designs of their actions in your storyboard! This will make us able to see what works and what doesn't.
4: Here you will make the necessary cuts and adjustments, give the final timing or your animation and make the X-Sheet, which is nothing but a simple and efficient form where animators write down the action and dialogue for a scene or shot. This helps in accurately and not run from what was proposed.
5: Animators start to animate!
6: Here the characters are finalized with their textures, colors and everything else. The scenarios will also be finalized.
7: You have your completed picture on disk with sound elements to dubbing! Backup it!
8: Synched and laid everything digitally. We are almost there!
9: Put your sound and picture on tape, or other media.
10: Go to film recorder to make film copies and distribute it to everywhere!
There are several ways to obtain an animation. This is only one, guys...
For a good final result, you literally need to give your soul for it. The ingredients previously mentioned you will get in your routine and a looot of studying while there is love for what you do. Pete Docter once said "If you love what you do, it's not really 'work' anyway."
Also, for better understanding, watch this amazing shortfilm that despicts the process of a animation film. From beginning to the end.
Yay! This weekI reached thehalf way. So muchlearning! In the previous weekwe understandthe importance of planningand doingablockbefore you goto refine youranimation.When you havea lot of informationbeingtransmitted,you mustfirstunderstand howit works.Sometimesthe headisin a way, but we do not havethematurityto put thatinto practiceat once, so you should follow thesteps ofplanning.
Planning: Have a clear idea of where you want to go with a scene before start a shot!
Blocking: Using the least amount of information necessary to clearly what you want!
The topicof this week isOverlapping. Believe. Itsounds simple, but is not in practice.You will be confuseof what you are doingand theiranimationbecomes amess.Youwill seebelow why it's complicated.
The concept is: With overlapping, things will move in parts. Where everything does not happen at the same time.
"What are you saying? Take it easy! Wejust lefttheballs!"
Yes, you're right.Thinkthat the ballhas onlyonepart. Let's talk aboutsomething more complex. For example,a tail. Will there be amovement whensome forceappliedtothe movementexists, maybe gravity, aweight orwind. The tail will follow the movement. This is called Follow Through.
Imaginethe tailbroken injoints. Think of theowner of thistail is the primary force.If herun out andstop abruptly, the tailwilltake longer tostop. If it ishard to imagine, swing yourarm likeapendulum andthen stop abruptly.Let's say yourshoulder is1,the elbow is 2, your wrist3andyour fingers4, as figuredin the pictureabove. Thesepartswill stopgradually. When thesholderstop,2, 3 and 4continue tofollow the arcof movement until finallythefourthstop moving.
"Okay...Buthow it willmovewhenaside to side?"
Goodquestion. Thencomesanessential part ofthe overlapfunction. When thefirstpart totheotherwill continue tomove, right? This movementis calledDrag, or WavePrinciple.Tipically it forms a "S" becausethe effect ofoverlap.
When stops, the rest will drag as he turns, then will follow through on next frames.
Usually there will be a Slow In and a Slow Out of the top must position. In the case of an appendage coming to rest, it may still be doing it's thing after the initial force hasstopped moving. My assignment had twodifficulties. I choseto deliverthe simplestbecause itwanted tobetter understandthe effect ofoverlap. ButI'll postthe two thatI did.
Hi again! At this stagealready mademore than a monthI'm doingAnimationMentorand I feel thatalreadyevolvesLOT!Not onlywith thelecturesand notesandtipssupplied byMentor...Butwith their peers.More than everI realizedhow important it isto criticizeand seethe work of othersto enhanceyour eyes andtry not tomake the same mistakes. Andbe ableto seethese errors! The communityisfantastic and veryhelpful.Critiquetheir work...And they willcriticize yours! Sometimesyou'reso tired andlaggedthat foryoumay seemperfect, butthere are mistakeseasily seenin the eyes ofother students...Which is great! As a friendwould say:Falconeyes!
Don't be afraid to fail!
This weekitwasAnticipationandSquash&Stretch.Twoprinciples thatgive a lot ofpersonality toyour animation.Moreover,you will hardlyanimatesomethingthat does not involvethese two.
Let'stalk aboutAnticipation first. Think about one thing:
AsIsaacNewtonhad saidlong ago, "every action has areaction".But what if Isay thatyou apply forthis reaction...You needananticipation? Maybe, because it makesclearerto understand what youwilldo. AndIf you do notuse,lookssilly. CharlieChaplinonce said:
"Tell 'em what you are going to do;
Do it.
Tell 'em that you've done it."
He meant "anticipation, action, and reaction." The story you are telling must see clearly what you are doing, feel every expression, every reaction. And, above all,to givebirth, no matter what style. Something elsecartooning will have more anticipation.Something realisticwould bemore moderate. Conclusion: no matter what you are animating, without anticipation, will look unnatural.
Nowlet's talk aboutSquash and Stretch.
This can be used whenever an object bends or straightems. The useof this toolcangive more lifein your scene. I readtheblogof mycolleagueterm, Brock, who heard fromhis mentorthe following definition:
“Squash and Stretch is like hot sauce. A little is good and goes a long way. Too much and your food becomes inedible.”
Awesome definition.
In bothyou mustbe careful not tooverdo itand make itvicious.Yousometimesalreadyanticipated, mustbe careful not toanticipate theanticipation.The same forsquash andstretch. You must takecare not to useall the time. Pay attentiontouse onlywhen it reallyseems necessary,otherwise itwill warpand youforgetall the timeeven asit was in theoriginal format.
For thisassignmentwe reallyputin proofour learningabout allthe principleswe have already learned. Arcsshould bevisibleandfluid. The ballreaches differentspotsduring the entiretime, sodifferentarcsand someinconsistentdisruptsthe animation. Thetiming andspacingare more thanessential. Theball must havedifferent speeds anddifferent heightsfor eachpointof the obstacle.
Here's my assignment for this week! See ya!
Hey boys and gals!
This weekwe return withballs...Butnow theyhavedifferent weight! To recapwhat we talked about in the last post,timing gives the meaningof the movement and spacing place your character, objetct, or whatever in a certain space determined by you.Remember the"Boink" RichardWilliams!
With a good timing, the movement is interesting, makes sense... And therephysics applied!
"What? I need to knowphysics??" ... Calm down, I have not finished. But yeah, you need the basics! You need to understand behavesas a bodywith somefactors. Thesefactors are: thegravity, weight, inertia, momentum, acceleration and deceleration. Laws of motion determined byIsaacNewton.
"Whaaat?"
You will not makeaccounts. Stay calm. Butyou need to understandjust howbodiesbehave in our world.
Animation is observation: experience to observe life.
Physics tells usthat if twodifferent massbodiesfallat the same place, thebodies tendto touch the groundat the sametime.This is becausegravity pullsthe twoin the same way. Whatyou need to understandis that afterher fall, she may reactdifferently.Andthe animationyou don't need necessarily followthe realitytoo seriously.Hereis where you canescape from reality! Remember one principle: Exaggeration.
Anyway, CarlosBaenaexemplifieslectureonan elephantfalling.Itis heavy, and if it stopsabruptly.Hewill not stopin time, right? Now think ofanant.If youthrow itaway, itwill stopquickly sosufferattrition.
In thisassignmentwe haveto worktwoballs. Alight and a heavy. Besidesdoingherjumpingon the same axis, I also made itout of thesame place.And for it,will formarcs, right?
For this,we can use thein between, orbreakdowns.
When we havetwokeyframes, saythey are theextremeposes. In the example, we will callA andB. There are endless possibilitiesyouget from pointA toB.Do you agree? Butwhen you want todefine theway he should go, you create abreakdownbetween the two extremes. And it'scrucial youdo it. Forthe3D animationthere is a dangerof lettingthe computerallthe interval. Butthat's whywe are herebecause the computeris dumb, and it will not createpersonalityfor you! That's why we are here :). With this, we can also addacceleration,or take ittoo.