Showing posts with label Animation Mentor. Show all posts
Showing posts with label Animation Mentor. Show all posts
When you are downloading something, you cannot use it until you finish, right? Try to think about it in your shot when you think you did everything!
So, when you are addicted in your shot after a polishing marathon.. Make some notes!
- Watch your animation with a critical eye and make a list about what you see;
- Your body mechanics need to have a good physics. Try to watch every part separated, one at time;
- Don't forget the original intention of your scene. Your goal is constantly pushing you and this is awesome to have a road to follow on.
Remember to fix your Center of Gravity Pass:
- Always start with the torso;
- Clean as much is possible your Graph Editor.
Legs Pass:
- When animating the feet, always pay attention to the weight of the body;
- Don't forget the silhouette;
- Build Squash & Stretch into your character's sillhouette using the entire pose;
- Make every frame appealing;
- Watch out for twinning, variation in legs gives a more organic feel.
The last 2%:
Okay, you are almost done!
- Be attent to pops and exaggerated Squash & Stretch;
- Pay attention to the ballroll animation, fingers, blinks, hair, etc;
- Polish where movement is initiated first, and then work your way out to overlap it.
Conclusion:
- Think you have more than 10%! This is normal and great at the same time, because you will be more critical about your work; - Without weight, you haven't a mechanical shot.
This is my final shot to my 3rd exercise in Class 2. :)
Hey! This time I will adress two issues! Let's see...
Describing Poses:
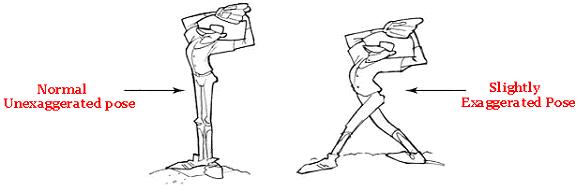
I was thinking to do some pose to talk about when I came across this picture by Michael D. Mattesi. Previously has been said about the possible ways to get into a final pose, right? "And what does it matter now?"
Animating a full body, it's essential to choose your key-poses, lest it becomes unknowable. So, whey you choose your key-poses, think about it:
- They must show the beginning and the end of an action;
- Change of an action;
- Change in characters thought the process.
One more reason (or many...?) to doodle enough before sitting in front of the computer. What you should do in the thumbnails:
Pose 1: Describing the beginning of an action; Pose 2: Describes the end of an action; Pose 3: Describes change of an action (action coming to a rest); Pose 4: Complete the action and show the final moment.
Rotating Bodies:
During my 3rd exercise in this class, I met the difficulty of caring the body rotation, and how this influences the dynamics of the scene.
Previously I posted a drawing of a baseball player to talk about torso. To rotate it right, you must know where to start your action. In this case, I was simulating a throwing of the shovel. That is: (a) I start the action by hand, (b) and then the shoulders, (c) chest, (d) belly, (e) waist...
It's always good you try to reproduce the actions to understand the mechanics. In this case, my waist was rotated to one direction, while the upper body to another.
A friend did this thumbs to help me to understand the intent of direction. Is almost like a tail! First he shows up the hands and goes to the award. When the hands are already in the hole, the feet are still walking in the air.
That's it for now :).
For this week we return to a subject discussed before. Perhaps the biggest reason is to emphasize that "the real art of animation comes with the subtlety of timing and spacing".
We have seen a lot of content beyond the balls exercise and I can tell how it affects timing and spacing and how they still walks hand in hand. A quick definition and which affects both:
Timing:
Is the phrasing of movement. Think like a music. The way you distribute the notes are like you decide to put your key drawings or poses, and it will create the timing.
This influences many other effects:
Weight and Force;
You should remember about what Newton said before: "a body will remain at rest or in motion until acted upon by an outside force";
External and internal force, like momentum. And momentum can't be separated from weight and force;
Don't forget: the property of a moving body that determines the length of time bring it to rest;
Creating contrast in timing clarifies ad accentuates internal state of character.
As you can see, timing remains an important factor that influences what you are animating. And you can't avoid to exaggerate it! At this point you can already notice the difference between styles and how timing is crucial to differentiate them. More you exaggerate, more cartoony you will have and this will be a healthy balance that you will care forever. Try everything!
Some tips to apply before and during your a shot:
1. Know what you are going for before you start it - physics, attitude and personality will ever effect the timing.
2. Put key poses on every frame in order to focus solely on the posing first. "They are more than just mood or dramatics: they also create extremes." It's important to put texture.
3. Start to move poses in time. If you think it need some hold, do it.
4. Play with the timing and see if what feels right.
5. Be aware of the rhythm you are setting up. As a music - again, try to break if is too consistently.
6. You can completely change the feel of a look just changing the timing without change the poses.
Spacing:
Continuing the reasoning and comparison with a music, spacing is how the notes are positioned between the timed keys. In the case, your poses. Will be with your spacing you apply the concepts of acceleration.
The pros agree: don't let Maya make the in-betweens for you, because will be completely unappealing and boring.
I used to track my spacing with software allowing you to draw on top of most applications.
Remember: You can always push poses to create more dynamic spacing or adress spacing issues. If you squash to a pose, you are in essence creating a blur frame, which will allow you to broaden the gaps and create a snappy timing.
Hey you :)
Today we will talk about something related to arcs: Path of Action!
Previously in class 01 you could see how arcs makes the difference for your animation. So far we used a body composed by one big ball. "What's the difference between the ball and a body with spine?"
Besides the fact that you have more to animate, nothing. You have to worry about the arcs in the same way... But now will have more! And the chance to turn it a mess is high. So you must understand clearly who is leading the movement. And finish it before care about with the rest. Remember the walk assignment; first the hips and than the legs. When you finish everything, fix the knees. When the animation is okay and you start to work in your arcs, you will see an imaginary path! In The Illusion of Life, Frank Thomas and Ollie Johnston wrote:
"Straight inbetweens completely kill the essence of an action."
So watch out, because Maya or other software will try to make everything straight! My actual mentor share with us a good and simple example about arcs here:
Believe me. Arcs can make a huge difference, even if your timing or your overlap is still stiff, just with a good arcs and a path of action, you have something better.
Nothing moves without force.
Sounds even poetic... And abstract.
"So.. How you will explain?"
Well... How it works! If you analyze the motion no matter what, there is always an applied force. Can be the Earth's gravity or even an object or person. This leads to two types of force that can be applied: External Force and Internal Force. External Force is about everything that comes out of the body you are analyzing. It can be a wind, or a person pushing you, or even a guy giving a punch in your face.
Since the head received the punch, it will lead the movement. After it, will be the neck, the upper body and so forth.
Internal Force is about a purpose with their own decisions. In this case, the action usually begins at the hip. But the point is, if you want to bring live into a character, that's how you will succeed. Because is the Internal Force who show the character is living, breathing or thinking!
This emphasizes to encourage us to always have on hand many references as possible and carefully analyze each action of motion.
Here my final assignment studying the torso and using an external force:
And here my last plan to the Class 2:
See ya! Arrrr!
Hi!
On this week we had one more class about stages of a shot. And since we've had a post about it, I'll talk about torso!
As you know, we start to animate a body without arms, forcing us to give emphasis to the spine, the newness so far... And how work with this?
Well, depends of your action. And you will see: the torso is more important than you think.
Here is more or less what you have. As we talked before, the hips can drag and help you in the balance. Since in 3d is different than 2d, here we need to move the controllers to shift and bend your character.
"I always knew that..."
Okay, but the point I'm getting at is that: being 3d animation, it will ask for something more realistic, since it's easier to the audience find something wrong with their eyes (except in Hotel Transylvania who brought a new experience on the format).
"And how I will make it more natural?"
Overlap. Did you remember the tail exercise? Is more or less the same. You cannot do it always, because the body will be too soft everytime, but you should stay tuned to know who is the primary force in your animation in each part. Is your head? Your hips?
Moreover, as in a walk, take care to rotate more than one axis.
Take a look on the baseball player. The arms are the Primary Force, so he will start with the shoulders and spine_c.
If you don't do that, will be unnatural. Even if you go to a cartoony way, remember to move everything! We always drag and push your entire body to make actions.
Hope you enjoy :)
See ya!
Hey guys, here we are with a new adventure.
From this week we will begin to use a new rig, with a torso! And this new element to be animated induce you to discover new elements to care about... The case on this week - and your entire career as an animator - are Weight and Balance!
Whenever something moves, a force was applied to this corps. And what better way to view difficult to the body moves it? Weight. It will help you to sell your intention.
For example, think about a body with a lot of mass, like an elephant. It will need much more time to gain momentum because more mass demands more energy. To stop this mass, you need to think the same: If you have more mass, you will need more time to stop it... And we realize that in the animation should apply the same concept.
"And what I need to know about the balance?"
You need to know balance and weight go hand in hand. The faster the body moves, it will have less balance! You always should apply the concept about the center of mass and put balance.
"Hmm... But what I need to do when I have more than one mass? If my character, for instance, are carrying something?"
Good question! This drawing by Fred Moore helps to understand it. You need to think your character and the the object - or another character - is one body, which means one center of gravity. If he's carrying a box, or other person, doesn't matter. And to show weight, you need to use more curves. If it's heavy, show it! Bend the torso, rotate your head, etc.
"Okay. And if I want my character is intentionally unbalanced?"
You must be careful, because it is difficult to achieve. You should deliberately miss the center of gravity and be more natural as possible.
See you :).
On this week we had another lesson on how to animate from planning to polish in the splinning pass, more or less like this:
1. Planning your animation.
Start thinking about what you want to do, and try to find and made as much references that you can.
2. After that, start the blocking pass.
- Make sure about your camera because the silhouette must work fine
- Start a rough block and capture the feeling of the important poses;
- Push them after make sure they are working;
3. Put the breakdowns.
- Divide your animation and work in sections;
- Don't forget the overlap and put weight on that;
4. Director/Mentor tip (looks like the teacher on Juan's shot haha!).
- Remember your goal, and make sure your mentor knows it too;
- Be specific and be ready to receive critiques.
5. Apply the notes.
- Put all tips into practice;
- Go to spline;
- Re-check the spacing;
- Re-check the path of action;
- Clean all curves and nail it.
6. Have fun!
Besides finishing our last shot with Ballie (phewww..), we started to plan our next shot.
See ya!
A quote to finish this amazing year:
"I have never in my life learned anything from any man who agreed with me"
- Dudley Field Malone
Hips one more time, because they are important.
Take a walk in front of mirror and look at the movement of your hips. Have so much importance on your hip so that movement can happen. This is because the hip start and drive the movement and this make a huge difference between a good animation and a bad animation. When we stand, our weight is never centered between the legs. For this reason, we shift to one leg or the other to distribute the weight. When you do it, it forces the hip to make an angle up on the leg that is taking the mass of your body.
"And why I don't fall?"
Because your Center of Gravity. Remember: all body is pulled to the center of the Earth, because the Earth's mass is greater. Otherwise, if we jump off, would leave the Earth orbit. Therefore, Center of Gravity is the point where you can balance all these forces of attraction.
To simplify finding your center of mass, you can draw a line from the neck down to the heel of the supporting foot and you can see if your pose is working or not.
"Okay. But what if my pose is extravagant?"
Well, always remember your hip is driving and starting the movement. Give attention to it to make your pose works. Let me show an example.
Look what she did with the arm to balance the body. And look how the body is distributed between the center of mass.
"I can break the rules?"
Yes, you can. In animation, we have freedom to exaggerate but, as always, know dosing and where you will do it. You can break the rules, but if you ever do it, lose the believability
Woosh, after choose what you will do, record and take a lot of references, have made your thumbnails... Is time to animate!
In the Animation Mentor we have to give a Stepped version.
"Yeah... You show it before. What exactly you need to show in a stepped mode?"
Since the stepped mode will give a "stiff" animation, you need to show the most important points like your keyframes, breakdowns and some inbetweens.
- Be sure about your camera! If you change after start it, sometimes your silhouettes loses the clarity;
- Focus on strong poses: as you are showing your idea without some in-betweens, you need to be clear;
- Try to be sure where you want your breakdown: Start to think in your arcs and use the breakdowns to define motion in your animation;
- If you can add overlap, do it. As much information to show to your director, better for everybody;
- After doing your poses, start to think in your timing: Adjust and watch till the timing be clear enough. Don't forget to add anticipation when necessary.
"Okay... What more?"
Feedback! Always be ready to receive and give feedback to everyone. The process will let you tired and your eyes addicted. So it's always good to receive some fresh eyes, even during the blocking... After all, this is where you should be clear while you present your idea.
Woot. How long!
I'm on a trip since I start class 2 and didn't have time to balance my life with my blog... So here we go!
I'm sharing with new classmates lessons in Class 2 (Psychology of Body Mechanics) mentored by Patrick Danaher! He worked at the new feature Hotel Transylvania, and was a great opportunity to be able to absorb what he has learned and produced for this different cartoony experience, which provided a new style for 3d animation.
Without drowsiness, begin the week researching what we will do one more exercise in our little ball with legs. On Class 1 we learn the various principles that we apply in our animations. The importance of each step to get the final animation. Now it's time to use them!
"It's been so long ... Could you refresh my memory?"
Sure. Let's talk about blocking, which is focused in class this week.
When you have an idea, you need to work it until it becomes something concrete. After that, you need to express and sell your idea and that's the purpose of the blocking phase.
This week has opened my mind about the priorities for your shot in the first stage. Before start your shot, make some questions for yourself:
- What are your goals for this shot? - How many frames do I have to sell it? - In your reference, the action is clear enough? The timing is acceptable?
Normally the body mechanics shots on the exercise are fast. You have between 5-10 seconds, so you need to have a clear goal for that. They will give a step and a big jump? Will just wait and kick? Keep it simple. Doesn't matter if you will do cartoony or realistic or even a mix... Just make it believable! After clarifying that, I think you're ready to start blocking. "How do I know this will be believable?"
Once you have a clear idea of exactly what you want... Look for references! Or be unique.. Make your own references. You don't need to be an actor or have awesome abilities with your body to show the idea.
After that, make thumbnails. Yeah! About your poses... You can do it in a different ways! Have some who prefer to do like a storyboard and exaggerate the poses on the 3d with drawing or your feelings, I don't know... The possibilities are infinite. My mentor, for example, prefer to take just the most important poses of the shot (something between 3 and 5) and make roughs of this, exploring more these poses.
Wohooo!!!
Class 1 finally ended. I can say that we learned a lot about the animation concepts. Also the value to bring life for anything! With power of animation, you can show for the public that a ball or an orc, or a biped moves, breathes, feel pain. IT LIVES!
I made so many friends who are helping me to improve my work. So thanks for the new, to the olds, my girlfriend and family for supporting this journey. And coming the next term! See ya around :)
Yeah. This is the last exercise of class 1. Phewwww!
Well, in the previous week we understand a lot about exaggerating your poses, your timing, etc. You want more cartooning? Exaggerate in your anticipation, right? And so on...
And if I told you in addition, you should worry about the rhythm of your animation?
"What do you mean?
If you want to be different, you need to do something different.
Sometimes a long cycle gets boring when you don't break the rhythm with something different. In my case, I use a higher jump plus a run.
"What's the difference between walks and runnings?"
Good question. As we learned in the first principles, for a faster movement, you will need fewer frames. Furthermore, there is something that we should worry about.
In my case, I used a 4 frames cycle to seem more cartooning. Note that if you think like a circle movement, makes it easy to think how many frames you will use for. The less you have, the faster will be as far the frame distance.
Anyway, he's my final assignment. Hope you enjoy :)
Yay! We are practically in the last exercise on class 01. In the previous week we finished learning all the basic fundamentals for a walk. And during this time, you should imagine that there are millions walks, right?
I've lived my college time in a big and bustling city, and if you stop for a minute to see the movement, you can see how diverse the walk is. You can see how the person is tired or hurry and their mood, only with the way he walks.And that's what you should look to apply in your walk.
"And how I'll do it to animate?"
Well, one of the main thing you need to think when you put personality is the weight. He will tell you a lot about your character. For example: a fat character! He will have a footstep change fast or slow?
"Hmm... Slow!"
Exactly. Think the motion difference with Roadrunner. He is so fast that you don't have courage to think that's heavy, right? You have to worry about your timing & spacing and inbetweens of your keyframes. It's like thinking about how many words you can make with the alphabet. The possibilities are endless. You will need many references. Record your own, look around! There is no excuse to what the internet can offer. When you start your gold poses, you will notice that there are similar poses with vanilla walk.
"Oh yeah? And what's the damn difference?"
Simple answer. Exaggeration. Unless the purpose of your animation is an almost rotoscoping and faithfully follow the reference, the animation will be boring! How is the mood of your character? The head is down because he is sad? Pull it down! Warp the spine and leave it devastated!
The more you can show who is your character, what he is doing, better! Remember: The people are watching defines what and who the character is. If you can sell this without your character say a word, you win.
"Okay... How do I dose the exaggeration?"
You cannot exaggerate too much. But also cannot leave as your human reference, because it will be boring. Train hard and show how your mileage will show the way.
Other tip is to think your poses as "story-telling poses" as Don Graham likes to call and making this more expressive. Also, you should take care of your silhouette.
Try to see the silhouette of the poses in your animation. When it is a mess, fix that. Certainly the result will improve in your animation. Look at the second example as he moved his left arm to improve the line of action of the spine. Sometimes it doesn't seem so clear in a silhouette like this where the arms are together with the body because is in perspective. But a silhouette in side view has difference.
Pheww... Class 01 is almost done. Here is my assignment:
Well, in this week 9 we are introduced to a problem that follows the animators till the end of their careers: Pops!
In the previous week we saw the importance of finding great gold poses. They are crucial for the moment to clear your inbetweens and everything.
"Okay, okay... Now I'm curious!Explain about these pops!"
Pops are dislocations improper in a short interval of time. It happens when something moves too much from one frame to another and he seems to jump. As an (bad) example, take a photo with your hand holding a cheek. Now, without moving, take a photo with the same hand in your mouth. Flip the two pictures and you'll see the hand jumping. Well, as you know, in 3d animation you should follow the rig model. I've had experiences with 2d animation in college and I can say that when you have something popping, you deform the design with your pencil or your tablet and will have no more problems... for now.
The biggest pop I suffered was the knees. It's a big challenge to put them in the right place and not let them jump. All this mixed with their gold poses. If they do not work, you can not fix the rest. In 3d this step is called Spline, where you will smooth your tangents on Graph Editor. To corrections, there are 3 parties in the body that work for this exercise: hips, leg and foot.
"Geez..! I don't know how these things work!"
First of all, walking is a system of controlled falls where energy is conserved. Knowing this, let's start with the hips. Last week we understand that here is a rotation during the change of steps. This happens to you don't lose your balance andbe able to control your center of gravity. The rotation occurs at the hip joint, not at the lower back. From the top view, you will have something like this:
Note that in passing position or close to it's when your body is straight. It is the moment that minimizes the body's center of gravity and prevents you to fall. The motion of walking is not perfect. It will behave like a boucing ball, but the difference is arc looks like a wave. Track the hips. Moving like a wave? Great, It's working.
Okay, now let's talk about the legs. Something that can give character to your walk is what you do with the legs. People tend to find that they spend most of the walk stretched or even forget to think about the move it behaves.
The legs are broken at joints and tend to move different in side and front view. The knee will go out at sometimes and will close to the hip on another. Also, do you remember the pendulum's exercise? The leg behaves like that, look:
"This is just crazy."
Actually, this is just just too much information. When you start doing, makes sense. You will find your biggest problem in your legs, in my opinion: the knees pops. To control this, you should stretch the leg sometimes, have to pull the hips more forward or backward othertimes.
Patience is your best ally.
In addiction to solving these problems, you have the foot. When it comes to animation, you should decide when the steps into the ground, and when it comes out. None of this happens out of nowhere and the computer is stupid, it will not do for you.
The foot is also broken into joint too, which gives toes for you.
We can not forget to make the overlap movement of the toes. This makes the animation much more dynamic. Furthermore, the foot will make an arc like this:
Note that the foot is about to leave the ground with a position and lands in another. You land your foot heel, until have 100% of the foot on the floor. Then you get to take your heels until finally the toes.
"Wow... I can feel the nightmare chasing me... What the hack?"
Yeah, in practice you realize why the animators have work to do a good walk cycle.
Track everything and see what happens. Don't let your knees have very different spacings. Don't leave the shin repeat movements. Make it always move in one direction, remember the pendulum. Remember how your foot lands and especially the arc that he must follow. Don't rely on the computer. Make the most of the frames by hand and then worry about cleaning up the Graph Editor when it makes sense. But most importantly: have fun! :)
Below my entire assignment of this week. See you!
Pheew... Second full month completed. In the previous week we had something organic like a tail, also we gave personality to the ball owner. This week we have something more human: walk! Above, my mentor teaching me to walk (rereading and inspired by De'Von Stubblefieldem). This exercise has it's own special importance.
"C'mon.. What is the difference of everything we've had so far?"
I'll tell you why. Walking can say who you are. Can say about your mood. Often you express what you are feeling with words. On walk you can express it all! Try to see Goofy walking. You can clearly tell that he's a dummy just like the way he walks. And you never have a walk like another. The possibilities are endless!
The purpose of this week was to animate a Vanilla Walk, which means a no personality walk.Watch people on street and you'll understand what this is about. They all ilustrate something like this:
Reminding the previous exercises, you will notice that the body risesand falls like a boucing ball.
"Hmm, you are right. I'm sorry to say that balls are not important to be animated..."
As boucing balls, animate a basic walk is part of the process to understand these steps above. Let's talk about them:
Contact Pose: This is the moment you rest your feet or toe on the ground. Usually the walks start with this pose.
Extreme Down: Here is the moment that you support your contact leg, feel the weight and picks up momentum for the next step.
Passing Position: You will have a straight leg, and the other ready to change the position.
Extreme High: It's the high point of the walk where the body begins to fall towards the other leg to make contact.
Repeat the process with the other leg and you will have a Walk Cycle.
"Walk what?"
Cycle is when you repeat something at the last frame is linked to the first, and then it become a loop. This allows an animator save time. You will have something like this:
In the case of this assignment, we have 5 key poses. 4 different, with the first and last equal, with different feet.
Something to note is how the hip works. Let's look from the image below:
As you can see, the hip will make a movement similar to a wave. It will also rotate, and the highest values are in the extreme poses.
"And this 0.5s?"
It is related to the time of half cycle. A full-cycle is only complete when the last frame is the same to the first pose. A basic walk defaults to 24 frames.
This week the walk is only a blocking, showing the key poses in stepped mode. Inbetweens is just next week.
In addition to the walk, this week return to do poses. This time we did a pose that demonstrate physical strength. I had trouble in some aspects. I'll show you why.
"This is awesome! Where's the problem?"
Well, in this assignment I realized the difference between doing force, be strong, and win something easy. More than ever you must reflect the weight in the pose. And here Stu is doing strength.. But he is the weak! Jose warned me saying that Tailor looks the strongest here. It feels like Stu is struggling to pull Tailor. For Stu to feel powerful he basically needs to be standing there calmly while Tailor tries to drag him away unsuccessfully.
So I took a deep breath and tried something different:
Well... No success again. If you remember the film, Thor cannot remove the Mjölnir.We concluded that the use of strength is there, but the main character is weak.
Therefore, my assignment of week 8 was like this:
This is me in my seventh week (inspired by De'Von Stubblefieldem). Here the purpose was animate a character with a tail. Although the concept of overlap has been presented in week 6, knotted in my head when involved arcs and respect the character rig. Different from the pendulum, here there is much more personality to transpire. Also, we learn to animate in layers!
"Wait a second... Layers? Are you saying that is like photoshop?"
Okay, let's talk about it first.Well, do you remember that one way to animate the effect of an overlap is to animate part by part? Basically that. Overlap is about a single member. Layers are used to animate parts of the body separately.
To better understanding, know that there are some ways to make an animation. Let's talk about them.
Straight Ahead as it is called when you start doing your poses frame by frame, sequenced behind each other. This will give a natural flow, you will know improvise and your scene will become a box of suprises. You can see the advantage or disadvantage asthey often do things that you did not expect, and do things beyond what it should. Remember: you usually have a pre-determined time for each scene, andwith this method you can easily blow.
To avoid these problems, there is a method called Pose to Pose. Here you decide the most important poses of your character - your keyframes. Then their breakdowns, and finally their inbetweens! This will give a clear and calculated scene. But you can lose the fluidity of your animation...
The third is a Fusion of the previous. Planning your scene, do a lot of thumbnails and try to find your keyframes on that. Dont run away from the center of interest. Put anticipations and other things. Work with your straight ahead based on this. If something is wrong, change your keys or replace them. You will see the importance of planning more than ever.
Try everything. Just Keep it Simple and find the method that will best fits you!
Layer animation is more or less it on this assignment: First animate the ball. When it is working good, we animate the tail!
Reminding the Wave Principle, the tail will behave more or less like this:
When the Primary Force is moving, the tail will follow the arc in different orders, one joint at time, giving the effect of Overlap. For a good overlap, ensure a good dragging motion.